Fashion: The Constructed Image.
Proposal:
The idea was to make a group decision on a subject, after much talking and discussing ideas, what will work best, what our each individual ideas are and we pitched each idea to our group.
We created a concept board of ideas that, we as a group had ideas with that done we each debated which one has the most potential.
We each chose Two Fairytales from the genre of Film - Literature and tasked ourselves to research and find out as much as we could about each Fairytale, I chose 'Snow White' and 'Wizard of Oz'
I found a wealth of information on Snow White, the Brothers Grimm version, the Disney Version and many other adaptations of this.
Wizard of Oz was a little harder to research, many of the examples that I came across where the Disney version or plays that have been done over the years, however I did find many interpretations on the psychology of the film/animation.
This opened up a few more doors with regards to ideas and concepts that I could follow to expand on my own knowledge of semiotics and symbolism within film.
Sketchbook Group work/ideas
 |
| First attempt at the wall |
Research
So for this part of our group research it was decided that we all in turn watch this DVD and then compare that to what we have seen when younger or other versions of Snow White.
After watching I found that the main storyline is the same, as with many other versions of Disney Films, they all appear to have the same basic characters, story line and the same happy ending.
This version, is slightly more for adults than small children.
I have had an idea of getting my 6 year old Niece to watch the Disney version then tell me what she thought about it, and I will ask her a few questions on what she thought of the characters and what she thought of the film as a whole, I need to make the questions not to complex but simple and straight to the point so that she is able to understand them and give me an answer.
I will then pending approval get her to watch the same DVD that I have watched and ask her the same set of questions then maybe get her to compare the two, what she thought was the same what she thought was different, things along those lines.
Depending on how and if this goes ahead I may ask her more in depth questions and try my best to interpret what she is saying about both films. Maybe even what morals she may think there are....
We will have to see about that but that is my intention as then I can ask the same questions to an adult after getting them to watch both films and do a comparison on both findings.
The afore mentioned DVD that we have all watched, Once everyone has seen it we will then discuss what we thought, what symbolic references to the bible were used.
David Blaine
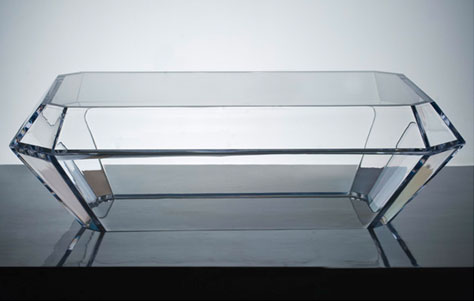
David Blaine challenged him self to live in a Glass box for 44 days. In this he is exposed to everyone who comes to see him, with almost no privacy. Although he is in a coffin and is almost powerless, he is in effect more powerful and controlling us, this is done by the height in which he has placed his coffin making us, the viewer look up at him from below.
Coffin Design/Construction:
This is very similar to what i want to achieve in my construction of a coffin, it has to be clear or see through and for health and safety reasons we will be using perspex.
The idea is that it will be a rectangle and not the traditional style of coffin.
the reason is so that she can sit, lay or pose in the coffin with out too much trouble.
Having the Prince kneel before Snow White at the foot of the Coffin
Costings/Materials
Job Roles
Ian Turner -
John Phipp -
Nikita Shergil -
Holly Young -
Ashleigh Wright -
Set Building

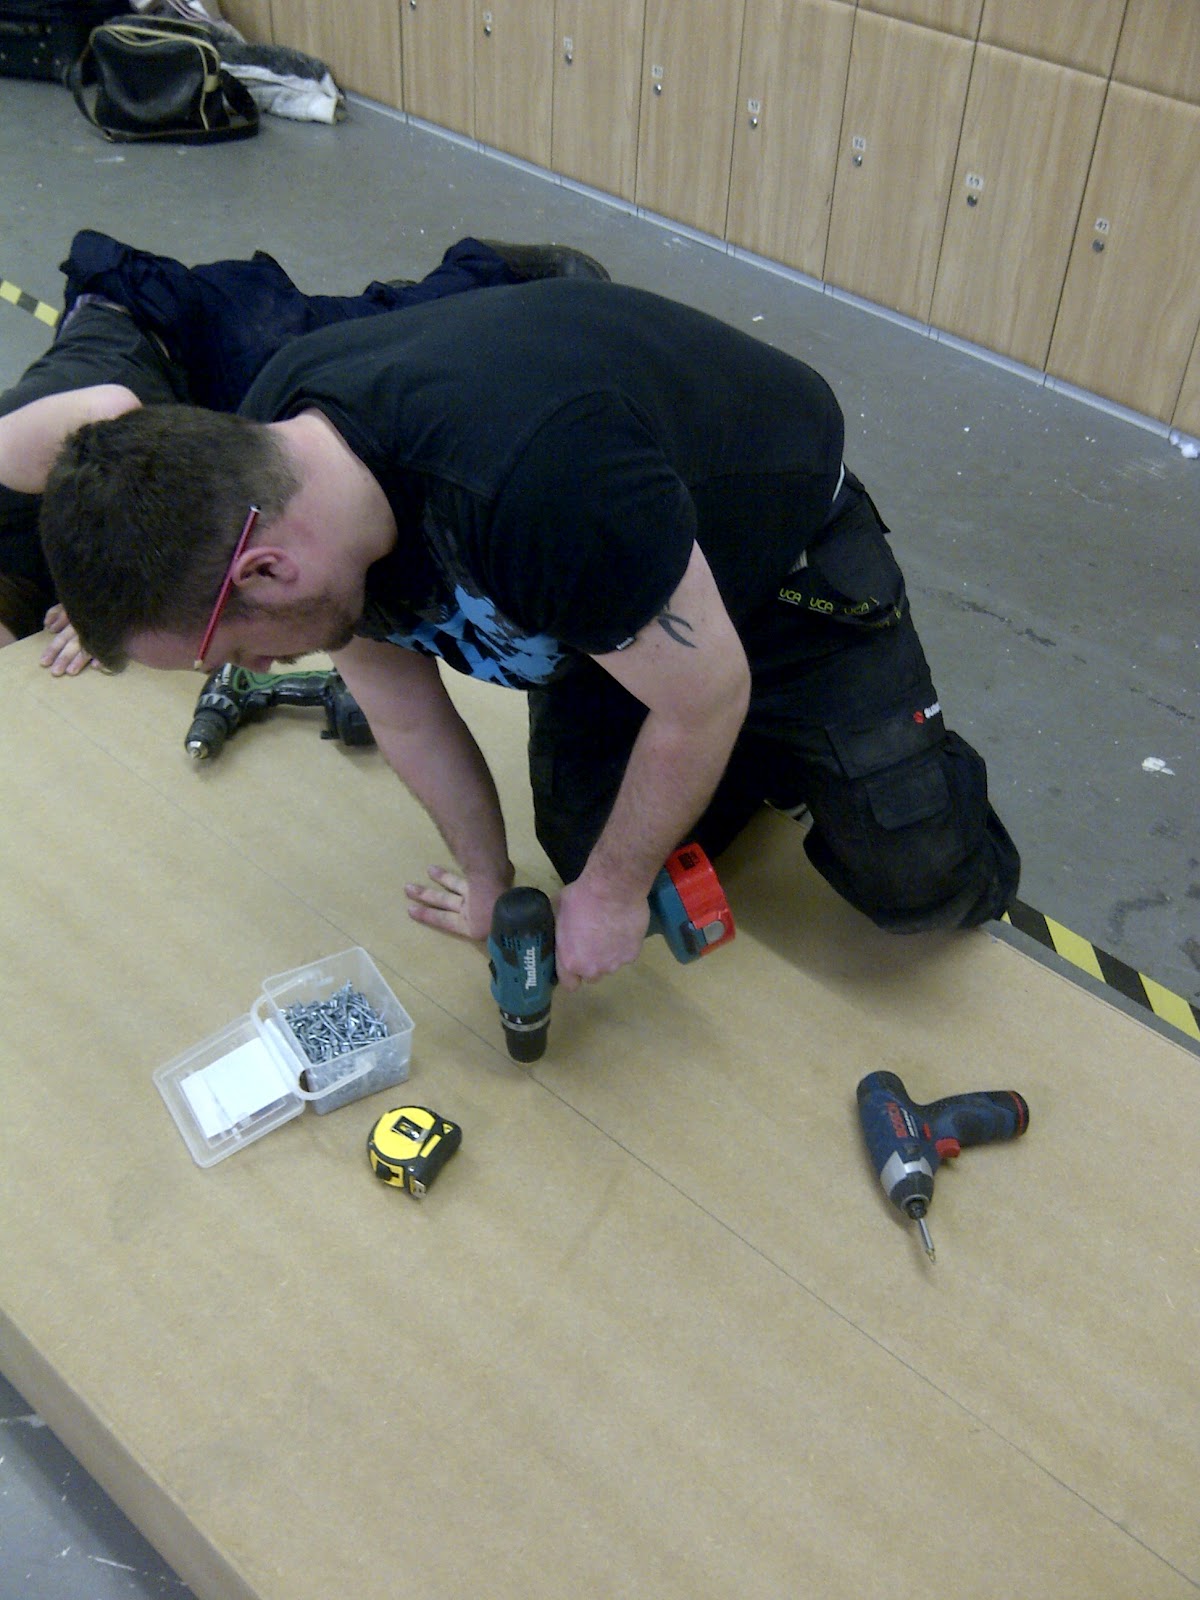
Getting the materials namely the sheets of pre-cut 8' X 4' MDF was a little hard, I had to obtain a trailer to get the MDF from B&Q in Ashford then drive it back to my parents where it would be stored until the next day when another friend would come in his van and take that, all my tools that i'd need and myself to UCA to begin the set build week.

I had 'employed' a friend of mine, Matt for the morning as he helped with the logistics side of things along with the construction.
he came and picked me up along with all my tools and the various materials that we would need for the week a head. He has been in the construction industry for many years and is familiar with working in confined spaces and was safety conscious, as there were lots of people coming in and out most of the day.
Once we had all the relevant materials, namely the sheets of MDF that we would need to construct the steps/staging we set to work almost straight away and were making good progress.
after a few hours we had the bottom and middle step already to go and strong enough to stand even jump on as this was a concern from the minute we were going to place the coffin on top of them, I made sure that they would be more than up to the job. I proved this on each step by jumping up and down on them at each stage to reassure everyone that they would be more than safe.

The two lower steps placed on top of one anther, I was unsure how we would fix these together but Matt already knew how it would work and knew what to do and so set about fixing them one on top of the other in a safe and secure fashion.

Not long after we had all Three steps made, fixed and all secured together so that they wouldn't move whilst the model was climbing in and out of the Coffin.

Once all Three were secured together we all set about plastering them so that it could dry and go off ready to paint whilst we were erecting the back wall. This took a while to fix to the flats, after that we then filled in the gaps and made it so that it would give the illusion of one complete length of wall, we also used a filler in the joints of the block work so to give an illusion of medieval pointing and the to dumb down the white pointing as this stood out too much.
The wall that we had created only a few days prior to our set build was finally taking shape, we had to make a few adjustments as mentioned before one of them being adding another piece to the top part as from the camera angle we could see part of the studio celling.

A shot from the front roughly where the camera would be placed, you can see the rear wall and it almost has the illusion of a complete wall, there were a few issues that we had to address with the joining of the Four poly boards but we managed to get most of the 'lines' out so that it wasn't visible.

After a lengthy discussion and advice from Jonathan, we ended up cutting out the top step so that the coffin wouldn't sit proud of the steps but instead Six inches inside the steps then we placed the cut off back inside of the coffin thus reducing the height of it from Two and a half feet high to just Two feet high, this on camera looked much better, at first I did have a few reservations about doing this but after going through with it I would agree with people in that it makes it look more part of the steps and not as tho it has just been put on top.

With the cut out done, with then held our breath whilst we placed the coffin into the steps, mainly because the guy that sold the perspex to hadn't told Ashleigh that the glue she was meant to use (that came with it) takes up to Three weeks to harden, by this point it was less than Two days!
After gingerly placing it in, we could then take off the protective film to see for the first time what it would look like against the background in inside the steps.

To our surprise we had previously thought that there would be a lot of reflections that could cause major issues but as it turned out we didn't have many and the ones that we did have we used to our advantage and removed or enhanced them by placing various lights around the set and trying out different techniques.

The arch that John and I had made from scratch, I was unsure at first how I would be able to and how it would be mad to support the arch but I made Four sets of frames and then fixed them together, probably a little more secure than was needed as it was only for show and not supporting much if any weight.
once the frames were complete we assembled them into the correct dimensions and fixed in place, once this was done we cold then focus our attentions on the arch and see how it looked through the camera and then how we thought that it should look.

Once it was all in place we mixed up the plaster and plastered it as quick as possible as it was coming to the end of the day so it would dry over night and be ready in the morning to paint and finish off.
This is the final outcome of it painted after being plastered, it matches the rear wall colour and this was decided as it was in keeping with the castle/cave theme.
 |
Level! (the frame for the arch)
|
Much to my surprise it was actually level and perfectly square, so no fear of it falling over in the night but more importantly no worries of it falling over on to someone whilst we were working near and around it.
 |
| The rear of the Arch |
 |
| Tarpaulin - so we could lay down the ballast flooring |
 |
| Test shots with Gray card |
 |
| More testing with Gray card |
Time Lapse, Construction/Striking
Post Production
Starting the Post production process
We had to create various mask layers to achieve the desired effect of cutting out parts of the drooping coffin at the rear.
More touching up
We had put in a curves layer to adjust the darker areas and give the blacks more detail and add more contrast to the image in places.
The final printing stages
We had to print a contact sheet which had Seven images on so that we could then decide on the correct image and print that larger, this was done with varying color differences on each image, enabling us to determine the best colour/right colour corrected image.
Final Dimensions used
Arch
Arch width: 2159.6mm
Column Dimensions: 609.6mm x 304.8mm
Middle height: 1676.4mm
Inside column width: 1554.48mm
Outside column height: 2438.4mm
Elevation of hardboard from ground: 260mm
Distance from back of right column to steps: 1778mm
Distance from back of left column to steps: 1778mm
Back wall
Height (Edges): 2438.4mm
Height (Middle): 3048mm
Width: 4876.8mm
Steps
Bottom: 2133.6mm x 1219.2mm x 177.8mm
Middle: 1957.8mm x 1042.4mm x 152.4mm
Top: 1830.8mm x 915.4mm x 152.4mm
Coffin
Height (Before reduction): 762mm
Height (After reduction): 609.6mm
Depth: 774mm
Length: 1676.4mm
Final Image(s)
Original image
Edited Image
Evaluation
The project has been very challenging and at times fun. Working as a team has never before been so interesting, in working with people taking on their ideas and their way of working.
Being very organised has been advantageous as we have been able to get materials, people, models and any problems sorted and organised rather quickly and efficiently. In the beginning we were struggling with finding a suitable model and having found one or two (keeping one as a back up) they pulled out due to other commitments and not being able to fulfill our requirements on dates/times etc.
We gave each member of the group a task or rather we divided up the job roles so that we each had things to do and focus on, this works well but on occasion because another group member was maybe out doing other things came across something that may be good or work well for out set has got the item even though it wasn't necessarily their job role.
Once we had broken down the tasks we had a greater understanding of what we needed to achieve and by what date. Unfortunately we were unable to store materials in uni, and so certain parts of the set had to be last minute but this, again was planned out and organised so that it could be achieved last minute.
The time scale that we had i feel that we were rather efficient in what we were doing and make used of the time available, there were times that we thought that we wouldn't get things sorted, mainly lighting etc but as a team we worked together and made it work.
The whole experience of set building has opened my eyes more, when I watch films I now see them in a different light, I see the amount of work that has gone into it.
I find myself looking deeper into things, films other images and the like, to see how they may have made the set, almost as if it were a magicians trick i'm trying to decipher.
Doing this as a group as had downsides, the ideas of some and disagreement of others one of which being the idea of having a snow white but a more adult theme very nearly turned into what I thought would be better suited to an Ann Summers or La Senza photo shoot. The idea of 'good Kate / bad Kate' was ok in it's self but there is a cut of point and having the model purely in her underwear, to me takes away the whole idea of it being snow white, which is loosely based upon a fairy tale originating from adult tales granted but we chose the them of a more seductive snow white but this has areas in which that it detracts from that.
However, that said after many many discussions we came to a decision that we all would agree on and overcome any disputes.